Making a 3D Object Follow Another 3D Object in Blender
In this tutorial, you will learn how to make a 3D object follow another 3D object in Blender!
Perhaps you may have wondered how to make your 3D models stick on, or follow, another 3D object. For example, you may have wondered how to make a hat model stick on to your character model, even if he moves. You may have wondered how to have your character(s) stay in a boat as the boat moves, or stay put inside a car, no matter which way the car drives. You might have wondered how to make a ball stay in the hands of a person no matter where that person’s arm moves.
You could do everything manually. Like with the hat, you could manually animate the hat movements as the character moves. But that is so time killing, boring, repetitive, and just unproductive. There is a better way..
In Blender, we can simplify this process using constraints! In particular, the constraint I use the most often is the “Child Of” constraint. This can help you too!
Here are the steps to pulling this off in Blender:
- Open up Blender and have 2 models ready and position them to follow. This could be a hat and 3D character. But to simplify the process, I’m going to use a cube and a sphere. The cube is going to act as our hat, and the sphere is going to act as our character.
- Select the object that you want to follow. In my case, I select the cube.
- Go to the Object Constraints tab in the Properties Window on the right.
- Press Add Object Constraint and choose “Child Of”.
- Your object now has a constraint to follow. But we need to specify which object that we want to follow. Select that object next to Target. I chose the sphere.
- Your cube might pop out somewhere else. I don’t really know why it does this, but to get it back just press Clear Inverse and then Set Inverse. It should pop right back.
- Now select your main object (the object that you want to be followed). In this case, I select the sphere.
- Move the object anywhere and observe the following. Congrats! You can now make objects stick and follow!
If you go back to the “Child Of” settings, you’ll see there are extra settings you can play with. For example, un-check the Z location and see what happens. If you move the sphere now, the cube will still follow but will not follow any of the Z-movements.
Under that, you’ll see a slider called “Influence”. 0 influence means the object won’t follow at all, and 1 means it will follow it strictly. If you put it somewhere in the middle like 0.5, it will follow but not really, it will lag behind. Like a dog not really willing to go for its daily walk.
That’s it! Have fun making stuff follow around. It doesn’t apply to 3D models. You can make your cameras follow as well (like simulating a GoPro on a 3D character), or have lights stick to your car’s headlamps so that no matter where your car moves, the lights realistically move along as well. I hope this tutorial has helped you and thanks for reading!
Thilakanathan Studios
I make CG-animated short films and tutorials for fun! This blog is dedicated to sharing the talented CG works of Tumblr users and beyond and helping you become the best CG-Artist possible! :)
How To Do Camera Shakes in Blender
In this tutorial, you will learn how to do camera shakes in Blender!
If you have seen one of the high-impact action scenes from any Hollywood film, you would notice that there’s a lot of camera shakes. Not only action films, but also in one of those natural disaster films, especially those earthquake films, there’s always a lot of violent camera shakes. Camera shakes help to add more impact to your scene. If you have a character who punches another guy in the face, it just seems a bit more violent and aggressive if the camera shakes as he makes impact. Or the lead up as well. If you have a big tough guy fuming in anger and his face turn red in anticipation of a fight scene, having the camera shake can make him seem more angrier. You tend to feel his inner explosive anger more.
While you could manually animate camera shaking frame by frame, there is a better (and quicker) way. Save that keyframing for more important camera movements like zooming in and panning and things like that..
Here is how you can employ camera shakes in your own scenes in Blender:
- Open up any scene you want in Blender (or use the default cube if that suits).
- Drag out a new window in the 3D viewport and the change the type to Graph Editor.
- Select your camera and add a keyframe anywhere (by pressing i or automatic keyframe insertion). You need to have at least 1 keyframe on your camera for this to work.
- In the Graph Editor, you should see that your f-curves are visible (those colored lines). Select an f-curve by left-clicking a name on the left. I chose the Z-location. This means the camera will shake up and down only on the Z-axis.
- Hover your mouse in the Graph Editor and press N to open up a toolbar on the right.
- Scroll down to where you see it says Add Modifier. Click it and choose noise. This is what will shake your camera.
- Playback the animation (or press Alt+A) and observe your camera shake. Go to the Camera View to see it live in action!
- You can also make modifications to your camera. In the modifier settings, you have a bunch of settings you can change. The Scale changes how quick your camera shakes, higher values makes your camera shake slower. The Strength changes how violent your camera shakes.
- Click the Restrict Frame Range. Start allows you to decide at what frame the shaking should start. End allows you to decide when the shaking should stop. So if I choose Start as 50 and End as 200, the camera will shake at frame 50 and continue to shake till it reaches frame 200. In and Out pretty much mean fade in and fade out. For example, if you choose say 5 for In, as soon as the camera is set to start shaking, it wouldn’t start shaking immediately but gradually make its way over 5 frames.
- The final option Influence, determines how much influence the shaking will have. That is, 0 influence will have no shaking effect, 1 influence will have full shaking effect.
And that’s it! You now have the ability to do the cinematography of a fight scene or earthquake scene in Blender. Throw in some tense music, and you have yourself an epic and impact-ful fight/earthquake scene! I hope this tutorial has helped you and thanks for reading!

How To Switch Cameras in a Blender Animation
Sometimes one camera is not enough and you want to work with 2 or more cameras in a scene. This tutorial will teach you how to switch between cameras during an animation in Blender.
If you’ve ever put on the director’s shoes and want to showcase your new animation with awesome cinematography, you may have come across a small problem: how do I cut to the next camera in this animation? And how do I switch back and forth 2 different cameras for this shot of 2 people having a conversation? You’ve probably approached this in one of 2 ways:
- Render your animation in 1 camera angle. Once the rendering is done to the point where you want the switch to occur, re-position your camera in another angle and continue to render from that. There will be a lot of stop render, start render, stop render, start render, especially if it is a dialogue shot.
- Manually animate the 1 camera. At the point where you want the switch to occur, you animate the same camera to quickly to move to the next angle. This way, you don’t have to do partial rendering like in 1 and you can just render it straight out and edit it later on in a video editor to remove the quick switch frames.
I used to follow the latter method. But I stumbled across an issue. I enabled motion blur in Cycles. This created a big issue actually. At the point where I animate the camera to quickly move to the next angle, there was tons of motion blurring going on. This added a HUGE amount to the rendering times. I mean, it took FOREVER to render that 1 frame where the switch happened. Then I realized there was a better way..
Here are the steps to do camera switching in Blender:
- You can use your own Blender scene, but I’m going to start with the default scene. Add in another camera (Shift+A -> Add -> Camera). You should have 2 cameras in your scene. Position each of the cameras to have 2 different angles. One could be a mid-shot of the cube, the other a low-angle close-up shot of the cube.
- In the timeline, we’re going to add markers where the switch will happen. Add a marker by hovering your mouse inside the timeline and pressing M.
- Go to another frame and add another marker by pressing M again. This is the part of the animation where the switch will happen.
- Select the first marker by right-clicking the first marker.
- Now select a camera in the 3D view.
- We’re going to bind this camera with the selected marker and switch cameras at this point. Hover your mouse in the timeline again and press Ctrl+B to bind.
- Now select the next marker and the other camera.
- Bind this camera with the selected marker by hovering over the timeline and pressing Ctrl+B.
- Playback your animation and you should see your camera switch where you added the markers.
If you have a dialogue shot between 2 characters, you probably just want to switch between the 2 cameras a couple of times in the same scene. Instead of creating more markers and binding them again, you can just duplicate the existing markers as this is much quicker and pain-free. Just select the marker where you want the camera to switch back to (Camera 1 for example), and press Shift+D to duplicate the marker. Move the marker past the 2nd marker (where Camera 2 is binded) and place it somewhere. You should see that your camera switches back again (from Camera 2 to Camera 1 again).
This method of camera switching is the best and most efficient way to switch cameras in Blender. You can animate your camera movements such as zooming in and out. The switch will still occur wherever you place the markers in the timeline. This works well for more than 2 cameras. Just keep making more markers and binding the cameras with Ctrl+B.
And that’s how you switch cameras in Blender! Please feel free to ask any question in the comments below and I hope this tutorial has helped!

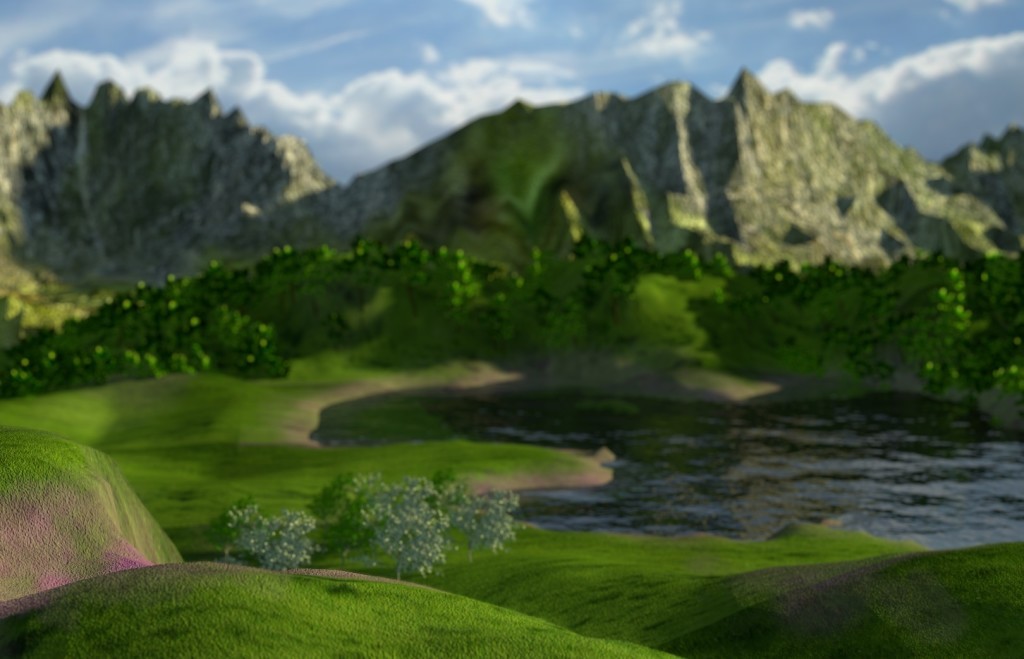
How To Create Mountains In Blender (In 5 minutes or less)
In this tutorial, you will learn how to quickly generate mountains in Blender!
If you are working on a scene in Blender, and realise you need to make mountains, you can either use this method from the Noob to Pro Wikibooks or use the method below which will generate it quicker:
- Open up Blender and delete everything if you want.
- We need to use a plugin that will generate mountains for us. So go to File -> User Preferences -> Addons.
- Look for (or type in) the addon ‘ANT Landscape’. Enable by checking the box on the right (near the scared-looking human figure).
- Close the User Preferences window.
- Now add the landscape by Shift+A -> Add -> Landscape. You should now have your own little mountain!
- But wait! Don’t do anything with the mountain yet! You can customize that mountain to look more like what you want. On the left, you will see mini-panel called Landscapes (if you don’t see it, press T to toggle the toolbar). Here, you will be presented with a bunch of options you can change.
Landscape settings
There’s a lot of settings here! The main settings are described below:
- Subdivision: This subdivides your mountain. The more subdvisions, the more detail you can throw at your mountain.
- Mesh size: Changes the size of your mountain.
- Type and Basis: Gives your mountain different distinctive looks based on textures.
- Random seed: Changing this gives a unique mountain while maintaining all the other settings. Good if you need a few of the same type (or breed) of mountains in one scene but want to make each of them look unique.
- Noise: The smaller the value, the more distortions and bumpy noise you’ll have on your mountains.
- Height: The maximum height of the mountain.
- Offset: Offsets the height of the mountain overall.
- Plateau: The height at which the mountain should have a plateau (look flat). Good to create Grand Canyon type of scenes.
- Sealevel: The height at which the sea level is. The naming is a little odd in my opinion, it should be called ground level. I would generally add the sea above this.
I hope this tutorial has helped you and hopefully you will have made your own mountain in 5 minutes (or less) as this tutorial promised! Feel free to drop a comment below and ask questions about anything!


Introduction to Sculpting in Blender
In this beginner Blender tutorial, you will learn about the basics of sculpting!
Quick links: Introduction | Interface | Properties | Navigation | Modeling | Shading | Texturing | Lighting | Sculpting | Animation | Particles | Physics | Rendering | Video Editing | Compositing
Have you ever wondered how these detailed looking renders were made? All those wrinkles, pores and veins? Well, I guess normal and displacement maps can be good at that kind of stuff but for more higher-end awesomeness, you can achieve this look with sculpting! Sculpting can give even better looking detailed renders compared to modeling by hand or relying on bump maps. With the latest developments in Blender, such as dynamic topology, you now have the ability to model a complete detailed character via sculpting by starting with just a cube. Let’s take a look at how we can sculpt in Blender.
Sculpting in Blender
1) First things first, open up Blender. We’ll use the cube so delete the lamp and camera if you want.
2) Of course, you can’t do much sculpting on a cube since it only has 8 vertices. If you want to do high detail sculpting, you’ll need much more than 8 vertices (think 100s to 1000s). So, all you have to do is just add a Multires modifier on the cube. We can’t use the subsurf modifier when sculpting for some reason. The multires does pretty much the same thing anyway.
multires modifier
3) Bump up the multires to about 4 or so. Won’t give us 100s of vertices but is good enough. The higher the value, the more you can detail your cube (should now look like a sphere) but obviously the higher you push this value, the more you’re going to strain your computer’s processors. I have crashed my computer oh-so many times doing this.
Subdivide to around 3 or 4.
4) Next, with the cube selected, go into Sculpt mode.
Select Sculpt Mode.
5) You should see a bunch of sculpting-related goodness in the Toolbar on the left. Here you can choose different paint brushes and stuff. There are all sorts of cool brushes you can use. For example, the Draw brush allows you to draw on your mesh (cool for drawing veins), the Smooth brush will smooth your mesh, and so on. Pretend as if your mesh is one of those clays you used to play with in school, and the brushes as one of the tools you can use to shape your clay.
The different brushes available in Sculpt Mode.
6) There are a bunch of options you can play with in the brush settings. You will likely see Add/Subtract buttons on a lot of the brushes. The Add button bumps up your mesh as your draw and the Subtract button carves into your mesh as you draw (cool for drawing wrinkles).
Sculpt away!
Dynamic sculpting in Blender
Blender has a pretty awesome feature called DynaTopo which means Dynamic Topology. This means that when you use the brushes on your mesh, the mesh will dynamically create vertices for you as you draw. You don’t need to rely on Multires. The good thing about this is that you save a lot of memory, since a dynamic sculpt will only focus on adding a lot of vertices around wherever the detail is required whereas a Multires will add a lot of vertices all over which is just unnecessary and CPU-hogging. The bad thing about dynatopo, however, is that you won’t end up having a nice topology structure once you’ve sculpted. Vertices will be placed randomly here and there and it will just be a mess. Certainly a nightmare to animate with! But there is a way to fix this using a technique called Re-topology, but that is a more advanced topic.
To enable dynamic topology in Blender, just go to the toolbar and under Options, you should see a check box with something like “Enable Dynamic Topology” depending on what Blender version you use. Click to enable and you can dynamically start creating a full detailed character starting from a cube! Oh yeah, make sure you remove the Multires modifier, it is not needed anymore, we have DynaTopo now.
That’s all! If you find yourself developing a passion for sculpting, I highly encourage you to check out some of the videos on YouTube where artists show timelapses of their sculpts. I find it to be quite enjoyable and you can learn some new techniques and skills just from watching those masters in action!
Quick links: Introduction | Interface | Properties | Navigation | Modeling | Shading | Texturing | Lighting | Sculpting | Animation | Particles | Physics | Rendering | Video Editing | Compositing


Beginner’s Introduction to Animation in Blender
In this tutorial, we will learn how to get started with animation in Blender!
Quick links: Introduction | Interface | Properties | Navigation | Modeling | Shading | Texturing | Lighting | Sculpting | Animation | Particles | Physics | Rendering | Video Editing | Compositing
Animation in Blender is very quick and easy. If you want to make a box move from point A to another point B in 3 seconds, all you have to do is move the box to point A on frame 0 and then set a ‘key’. 3 seconds down the timeline, move the box to point B and then set another ‘key’. When you play back the animation, you will see your box move from point A to point B in 3 seconds. Simple as that! You’ve made you’re first animation. You can do a lot more than that, though! You can animate how it rotates, as well as how big or small it scales. All you have to do is set keys anytime you want something to happen. A key (or keyframe) pretty much just sets the properties of the object at that specific time. So say, I set a keyframe on the 5th second of a cube that is rotated 30 degrees, that is located 5 units above the Z-axis and scaled 2 times the original. That means, when I playback the animation, the cube will always be rotated 30 degrees, and be located 5 units above the Z-axis and be scaled twice the original size when the playback has passed the 5th second. By setting a key, we have ‘locked’ our object with those properties in place. Here is a tutorial that covers keyframing better in case I explained it horribly! I guess it’s nice to know that Blender can do all of this, but exactly HOW do you do all this?!?
My character animation..
There are 2 different ways you can animate in Blender:
Pressing the i key
To set a key (or keyframe) in Blender, you simply press the i key on your keyboard. You may be presented with a number of options. Depending on whether you want to animate the location only, rotation only, scale only, or a combination of the others, then you select the option that corresponds. Suppose you will regularly need to animate location, rotation and scale all at once. You would then select ‘LocRotScale’. This would set keys for the location, rotation and component properties of the object. If you’re a serial animator and you hate having to select an option every time you press i, you can set the Active Keying Set (found in the bottom of the Timeline next to the red circled button) to LocRotScale. Just press that key looking image inside the textbox and you’ll find those options. Now every time you want to animate your object, you simply press i without having a dropdown option to annoy you!
Automatic keyframe insertion
Another way to animate in Blender (and a personal favourite of mine!) is to use the automatic keyframe insertion! This is that red-circled button I mentioned earlier found in the Timeline. Once clicked, it will assume you are animating with the option LocRotScale. If you want to change this to something else, change the Active Keying Set (the box next to it) to another option that you prefer. To set a keyframe, you simply work with your object directly. Say you move an object to point A, a keyframe should already be set (you should see a yellow line indicating a key in the Timeline). If you go to another point in the timeline, and move somewhere else, another keyframe would automatically be inserted. Blender detects any change in the objects properties and sets a key if a property has changed.
A bouncing ball animation in Blender.
Give it a go for yourself!
- Start with a UV sphere.
- At frame 1, set a keyframe (using i or automatic keyframe insertion).
- Then go to frame 10.
- Move the sphere somewhere else and add another keyframe.
- Playback your animation (by pressing the play button or Alt+a).
That’s all! Of course, there are more advanced types of animations you can do in Blender such as armature animation (that is, animating characters and so on) but that is best left for another day. Same principles still apply though, you use either the i key or automatic keyframe insertion to animate your characters. Give it a go, animate something cool. Download or make a quick car 3D model and animate it driving around a race track. With a bit more practice, you will get used to Blender’s animation system.
Quick links: Introduction | Interface | Properties | Navigation | Modeling | Shading | Texturing | Lighting | Sculpting | Animation | Particles | Physics | Rendering | Video Editing | Compositing


Beginner’s Introduction to Particles in Blender
In this tutorial, we will learn how to work with particles in Blender to create cool looking effects!
Quick links: Introduction | Interface | Properties | Navigation | Modeling | Shading | Texturing | Lighting | Sculpting | Animation | Particles | Physics | Rendering | Video Editing | Compositing
If you’ve watched some 3D animated flicks, you may have wondered how they create fireworks, rain, glowing orbs, dust particles or even hair/fur. The secret all lies in particles! In Blender, we use the in-built particle system to re-create these effects. So let’s take a look at how to use this system!
Particles in real life
Using Blender’s particle system
1) Delete everything and leave the cube. Select the cube.
2) Select the Particles tab in the Properties window.
Create new particle system
3) Press the ‘New’ button to create a new particle system for the cube. Now playback your animation (Alt+A) and you should see that your box is now emitting particles. Your cube should sort of act like the nozzle of a shower head.
Showering particles
4) This is made possible by the bunch of default settings that have been automatically set up for you when you created a new particle system. Play around with these settings to make the particles do weird stuff.
5) A few things. The Emission bit of the settings are used to control how many particles you want, the start time for when the particles for when the particles should appear and the end time for when they should go away. The Physics bit controls how the particles move and their sizes and other physical related stuff. The Cache is used to store your final particle animation either in a separate file or within the blend file. This is good to do after you are happy with the final animation of the particles since when you want to render or preview later on, it would not have to re-calculate the animation.
Particle settings
6) If you don’t want gravity to affect it’s movement, you can switch off the gravity completely. Either go to the scene tab and change the Gravity Z-setting from -9.81 to 0. This will affect the gravity of your whole scene. So if any object relies on gravity, they too will be affected. Another (better) way is to turn off the gravity for just the emitting cube. In the Particle tabs, you will see a section called Field Weights. Here, slide the gravity to 0.
Set gravity to 0
By playing around with these settings, you will be able to simulate fireworks or rain or even floating dust particles.
Let’s create hair
The particle system is not only used to simulate fireworks and stuff, you can also make hair and fur using it. Here’s how to do that:
1) Change the type from ‘Emitter’ to ‘Hair’ in the Particle settings, you would notice your particle system now becomes your hair system.
Change type to ‘Hair’
2) Play with the settings for a bit. Similar to the emitter, changing the emission number will change how many strands of hair your mesh will have. That is, bumping up the emission number to 2000 will give your cube 2000 hair strands.
3) Let’s comb that hair! At the moment, it looks like the cube has suffered an electric shock or something. So we should comb that hair back into place. In the 3D view, switch from Object Mode to Particle Edit.
Change to Particle Edit mode
4) Just like sculpting, you will see a bunch of brush options in the toolbar on the left (press T to open if you don’t see it). Select the Comb brush.
Select ‘Comb’
5) You are now the barber! Go to your mesh and left-click drag to start combing. Go crazy and comb that unruly hair to any shape you want.
Stroke along the edges of the hair to comb
6) You might find that your mesh has WAY too much hair everywhere and it probably needs trimming. Well, you are the barber here and you have full control over how you want your hair to look. Select the Cut brush and cut away at the hairs you don’t want. If you want to trim hair and not cut it off completely, make sure you cut along the outer edges.
Stroke along edges to cut hair
7) Just a final thing that might help beginners as this part might confuse. This applies to those using older versions of Blender. If you want to give your hair a shader, go to the Particle Settings, under Render choose Material: 2. Now in the material settings, create a new material under the already existing material ‘Material’. This new material will be the hair’s material. Why? When you selected Material: 2, you actually mean the second material of the mesh. So if you had like 5 materials for your mesh in total, and you selected ‘Material: 4’ in the particle settings, the hair will render with the 4th material in the slot. A little confusing but that is currently how Blender works. In the future, this might change and this post might become redundant, but for now it is just the way it is.
If you are using a new version of Blender (mine is around Blender 2.76), you will still need to create a new material under the existing ‘Material’. Then in the Particle settings, under Render, change the material from the dropdown directly! Easy as that!
Creating a shader for hair
I have to mention that the hair system is not ONLY used to make hair and fur. You can replace those hair strands with 3D models (which is done by going to the Particle Settings -> Render -> Change to Object -> Select your object). This means you aren’t just limited to hair but you can create forests of trees, cities, crowds of people, flock of birds, you name it. The particle system saves a lot of memory so rendering 1000s of trees will not break your PC compared to you duplicating a tree 1000s of times and rendering that. The image below was created by me where I used tree models to represent hair strands!
My dodgy attempt at creating an aerial island forest
And that’s all! Hopefully, you’ve learned about working with particles in Blender!
Quick links: Introduction | Interface | Properties | Navigation | Modeling | Shading | Texturing | Lighting | Sculpting | Animation | Particles | Physics | Rendering | Video Editing | Compositing


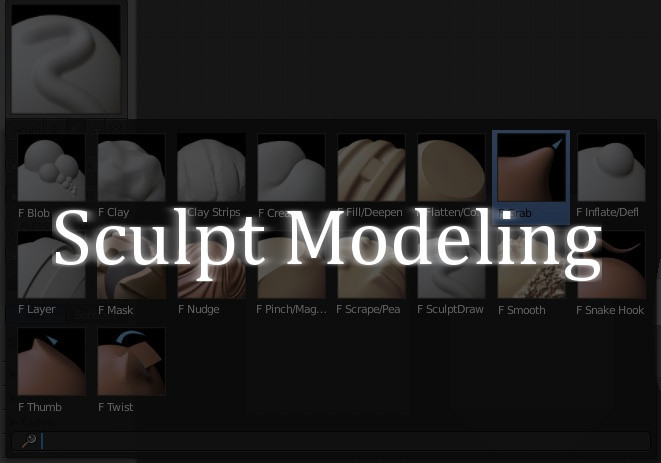
Sculpt Modeling: The 3D Modeling Technique
Sculpt modeling works similar to the way we may sculpt in real life. This is a fairly new way of modeling in 3D. If you have experience sculpting stuff in real life like clay models, then you’re going to have a lot of fun digital sculpting. There are many 3D applications dedicated completely to sculpting, such as ZBrush and Sculptris. Blender can also function as a sculpting tool. These applications contain a bunch of different brushes which may aid in sculpting your model the way you want it. There are brushes that can add form to your model and make it bumpy and rough. There are brushes where you can smooth things out, or use an image texture to add indents (like pores) into a model. You can also use image textures to create lizard skin.
Sculpting Brushes in Blender
You can literally turn a cube into a giant hulk beast using nothing but sculpting. This is possible by something called dynamic topology. That is, as you use your brush to paint and control the look of your model, the sculpting software is smart enough to dynamically add (or remove) vertices and reshape your models accordingly. You don’t have to worry about pushing and pulling vertices, or extruding and adding loop cuts and so on. Unleash the artist within you as it is the artist that is in control, not the software. And that’s a good thing! We don’t want software to control or restrict how our models will look. Only our imagination should have the permission to do that. And sculpting is a step forward in the right direction.
One drawback with sculpt modeling, however, is topology. If you want to stuff up your topology and create a mess with a bunch of vertices and faces that are hard to edit, then sculpting will always give that. Almost always, dynamic sculpting will give you more vertices than is necessary and may find that it hogs up a lot of your PC’s memory when your sculpted models start to get detailed. Many sculpting software applications do have features that smartly control memory consumption but still it isn’t overly smart. If topology is important (that is, if animating, or memory consumption, or even selling/working for someone), then sculpting is best used in combination with retopology (explained in this post).
An artist would generally approach sculpting by starting with a cube or sphere. It doesn’t really matter in this case. This is the base model. From there, the sculptor would build up form using the brushes and constantly refine/smooth. There are no specific rules to how to sculpt. Both Sculptris and Blender are FREE! Go and download it and then create whatever you like right away! Just do what your inner artist tells you.


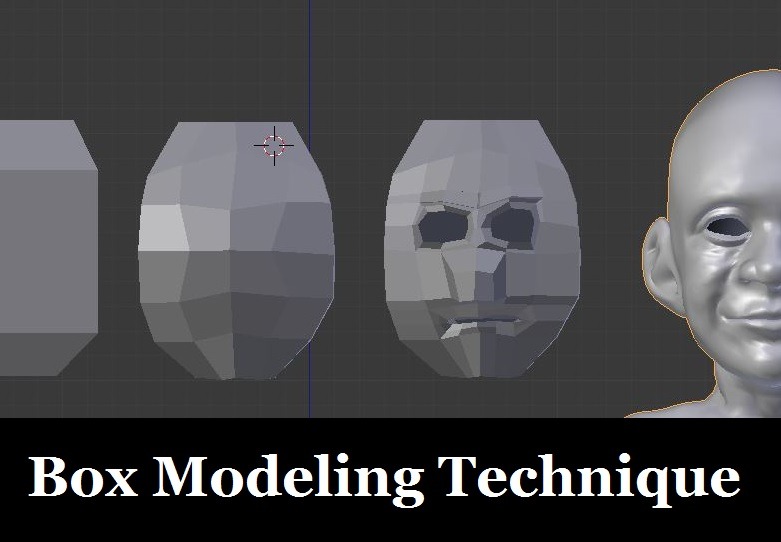
Box Modeling: The 3D Modeling Technique
Box Modeling is a technique that is most popular with beginners. It can help you created detailed models in an organized and structured manner. Box modeling can also be a great way to sketch out and try ideas early on. This is mainly because box modeling is really quick and efficient. Box Modeling works by starting out with a cube and blocking out the overall shape and form of the thing you want to model in box-like shapes. The reason for choosing cubes (or box-like) shapes is because cubes are easy to manipulate. They only have 8 vertices in total and it’s generally easier to create box-like shapes than rounded circular shapes. Box modeling mostly utilizes tools such as extrusion and loop cuts.
You first block out the overall shape and form of the object you want to model. You start with a cube and extrude faces out. You then reshape these faces to fit the shape of the thing you want to model. Reshaping can involve changing the location, rotation and scale of the vertices/edges/faces.
Once you have your “blocky” object created, you then refine the model and get it looking closer to your desired object. Remember, the more detailed your object is, the more vertices it’s going to need. You can do this via extrusion or loop cuts. Loop cuts can be an effective way to add detail and help further shape your object.
Box Modeling stages
Don’t ever feel the need to purposely add in more vertices in the hope that it will give you super detailed eye-catching models. It simply won’t. Only add the amount of vertices that are necessary for your model. A highly detailed character for a movie would need far more vertices than a simple table for instance. A simple table would not look like a super table if you throw in thousands more vertices at it.
So that is basically the process of box modeling. You start out with a cube and block out the main shape and form as if you were working with a lego set. Then, you go and refine the blocky lego model by adding loop cuts, extrusions and reshaping them accordingly. Finally, you may add modifiers like the SubSurf modifiers to smooth things out and create more detailed renders.
Box modeling is best used to make hard surfaced objects like desks, doors, TV screens, sofas, furniture, buildings, and so on. You can model cars, houses, streets and so on.
You can also use box modeling to create more complex objects like animals and humans. Both are the same thing, I know. However, things can get complicated if you want to animate them, since topology becomes important. You can learn about topology here.
That’s it! I hope this post has helped you. Later on, I will add some more tutorials to this site which utilize box modeling so that you get hands-on experience as a box modeller!


What is Retopology in 3D Modeling
Retopology is the process of taking a model with bad topology and making a copy of that model but this time with good topology. It is essentially, the process of fixing a model with bad topology. It is a very popular technique and that is growing rapidly. This is a fairly new technique and rarely ever existed a decade ago. Retopology didn’t exist as a technique because some crazy statistic said “3D modelers are getting worser at 3D modeling at an all-time high of 50% this year, something needs to be done before it’s too late.” Retopology is actually used to compliment the other modeling techniques where topology took a backseat. The process of retopologizing mainly involves the polygonal modeling technique (explained in this post).
Let’s take a look at how a 3D modeler may make use of retopology in his/her workflow:
- Create a 3D model using sculpt modeling (or 3D scanning).
- The result is a really good-looking 3D model (hopefully) but a model with bad, crowded, messy and unorganized topology.
- The 3D modeler now uses that awesome super-detailed 3D model with bad topology as a base, and creates a new mesh on top of that uses polygonal modeling to retopologize over the high-detailed model.
- The result is slightly less detailed but near accurate to the original 3D model.
- The 3D modeler may then bake the bump maps and such to preserve the details from the original model and apply this bump map image texture to the lower resolution retopologized version to fake the details.
Retopology in action
That’s basically the general workflow for retopology. You have the freedom to create high-detailed 3D models using the sculpt modeling technique without worrying/caring about topology and/or memory. Then later on, you “fix” the topology using retopology while being prepared to accept the fact that you may lose detail along the way.
In Blender, you would generally approach retopology by importing your high-resolution 3D model. You would then create a new mesh. Vertex by vertex, you would “stick” them on the detailed mesh. You can use the “Snap during transform” button which is shaped like a magnet and choose “Face” in the dropdown next to it. Vertices will now stick onto any closest mesh surface it could find. Below is what the tool looks like:
You would approach the same way as you would polygonal modeling (read about it here). That is, you would extrude a vertex, stick it to the detailed mesh, extrude another, stick that to the detailed mesh and keep it going on. All the while filling in faces where necessary (pressing F to do so) and taking note of good topology while placing your vertices. You shouldn’t guess where to add vertices or place them randomly wherever you feel like. If you know the right topology for your model, you will know what you are doing and where to place your vertices. With more practice, you should be getting quicker and quicker and vertex placement will become second nature to you.


